Overview
Deliveria is a desktop application that allows a delivery manager to manage and assign delivery tasks efficiently. While it consists of a Graphical User Interface (GUI) that is user-friendly, Deliveria is optimized for those who prefer to work with a Command Line Interface (CLI) which allows fast management of the delivery tasks in an organisation.
Summary of contributions
-
Major enhancement: added the ability to view Customer and Driver details in separate window
-
What it does: Allows the user to view the full customer and driver details in a seperate window. The Customer Window also has a map feature allowing the user to see the location of the Customer on a map.
-
Justification: This feature improves the product significantly as it allows the UI to display only the essential information of both the Driver and Customer. This will result in a cleaner UI. It also allows the user to open multiple window simultaneously so that they are able to crossreference information easily.
-
Highlights: This enhancement affects the Driver and Customer Cards in the UI. The implementation was challenging as it required changes to the existing command result and the additional map feature. _
-
-
Minor enhancement: added a Driver rating system and a notification window that shows incomplete tasks from previous days.
-
Code contributed: [Link]
-
Other contributions:
-
Project management:
-
Managed releases
v1.3-v1.4(3 releases) on GitHub
-
-
Enhancements to existing features:
-
Added Customer Driver Manager along with the storage component for Customer and Driver (Pull request #111)
-
Fix bug where uncompleted tasks from previous days remained inside driver schedule. (Pull requests #143, #223)
-
Add Add command for customer and driver and edited the delete command to include customer and driver. (Pull request #98)
-
-
Community:
-
PR reviewed (with non-trivial review comments): #95
-
-
Contributions to the User Guide
Given below are sections I contributed to the User Guide. They showcase my ability to write documentation targeting end-users. |
Add a Customer addC
Adds customer to the customer manager.
Format: addC [n/NAME] [p/PHONE] [e/EMAIL] [a/ADDRESS] [t/TAGS]
Examples:
-
addC n/John Doe p/98765432 e/johnd@example.com a/311, Clementi Ave 2, #02-25 t/friends
View full Customer details viewCW
Opens a separate window with all Customer details and a map showing location of Customer Address.
Format: viewCW CUSTOMERID
| Working internet connection and valid address is needed for map to work. |
Examples:
-
viewCW 1
Add a Driver addD
Adds driver to the driver manager.
Format: addD [n/NAME] [p/PHONE] [e/EMAIL] [a/ADDRESS] [t/TAGS]
Examples:
-
addD n/John Doe p/98765432 e/johnd@example.com a/311, Clementi Ave 2, #02-25 t/friends
View full Driver details viewDW
Opens a separate window with all Driver details
Format: viewDW DRIVERID
Examples:
-
viewDW 1
Contributions to the Developer Guide
Given below are sections I contributed to the Developer Guide. They showcase my ability to write technical documentation and the technical depth of my contributions to the project. |
Logic component

API :
Logic.java
-
Logicuses theAddressBookParserclass to parse the user command. -
This results in a
Commandobject which is executed by theLogicManager. -
The command execution can affect the
Model(e.g. adding a person). -
The result of the command execution is encapsulated as a
CommandResultobject which is passed back to theUi. -
In addition, the
CommandResultobject can also instruct theUito perform certain actions, such as displaying help to the user.
Given below is the Sequence Diagram for interactions within the Logic component for the execute("del t/1") API call.

del t/1 Command
The lifeline for DeleteIdCommandParser should end at the destroy marker (X) but due to a limitation of PlantUML, the lifeline reaches the end of diagram.
|
Customer Feature
Add Customer
Implementation
The Add Customer feature adds a new Customer into a Customer list.
It uses the AddCustomerCommand, which extends Command, to add a Customer into the CustomerManager.
AddCustomerCommandParser is also utilised to parse and validate the user inputs before sending it to AddCustomerCommand to execute.
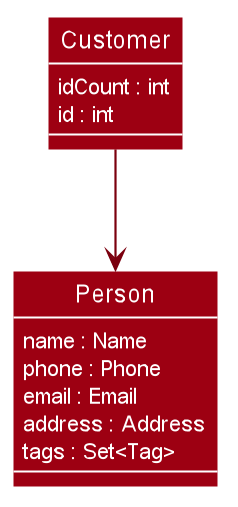
AddCustomerCommand requires the following fields: Customer.
The attributes of Task is as follows:

As seen in the above class diagram, the id field is not required when adding a customer.
The mandatory fields for users are: name, phone, email, address.
A unique id will also be allocated to the Customer for differentiation.
The following sequence diagram shows how the add customer operation works:

Design Considerations
Aspect: Usage of universal Command word
-
Alternative 1 (current choice): Have a individual command word for adding customer. (
addC)-
Pros: Easy to implement and increases clarity for users.
-
Cons: Increases the number of commands.
-
-
Alternative 2: Combine
AddCustomerCommandwith otheraddcommands-
Pros: Will use only 1 universal
addcommand for adding any entities. (Task, Customer and Driver) -
Cons: Have to handle different type of parameters and some parameters of commands are overlap which requires more validation.
-
View Customer Window
Implementation
The View Customer Window retrieves the details of a Customer and displays it in a separate window.
It uses the ViewCustomerWindowCommand, which extends Command, to return a CommandResult with a boolean value viewCustomer as true.
ViewCustomerWindowCommandParser is also utilised to parse and validate the user inputs before sending it to ViewCustomerWindowCommand to execute.
ViewCustomerWindowCommand requires the following fields:`customerId`.
| A working internet connection and a valid address is needed for the map to show in the window. |
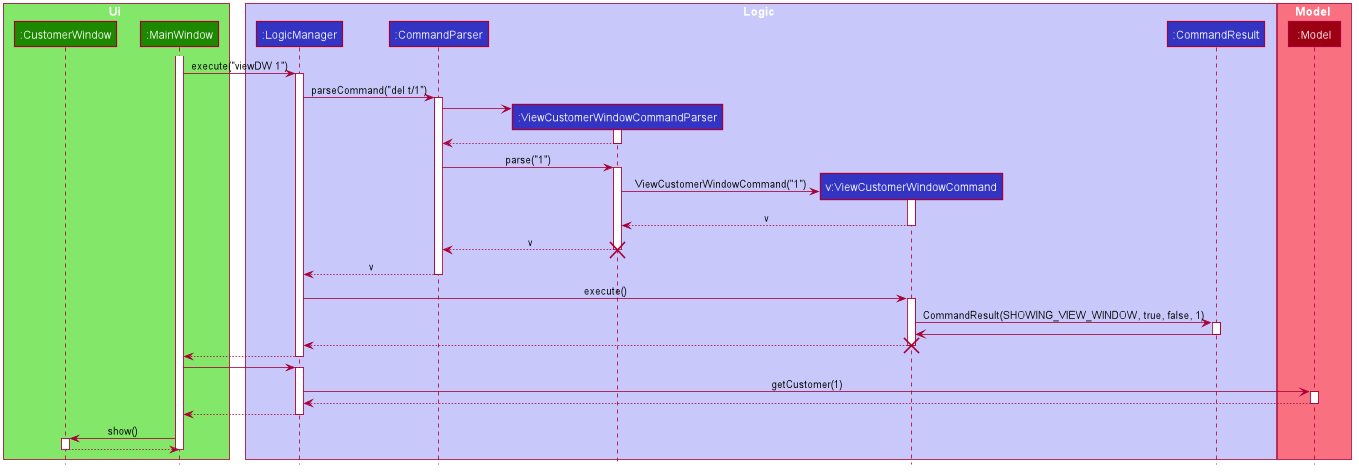
The following sequence diagram shows how the user command viewCW is being executed and handled.

Aspect:
-
Alternative 1 (current choice): Show full details of customer in separate window.
-
Pros: Unnecessary details of driver clutters up the UI. This cleans up the UI allowing the card to only show all essential details. Allow the space for working map showing the location of the customer’s address.
-
Cons: Harder to implement.
-
-
Alternative 2: Show full details of driver in a single card in main window.
-
Pros: Easier to implement.
-
Cons: Cards becomes too big when schedule information gets too long. Ui looks very cluttered. Unable to show the map of customer’s address.
-
Driver Feature
Add Driver
Implementation
The Add Driver feature adds a new Driver into a Driver list.
It uses the AddDriverCommand, which extends Command, to add a Driver into the DriverManager.
AddDriverCommandParser is also utilised to parse and validate the user inputs before sending it to AddCustomerCommand to execute.
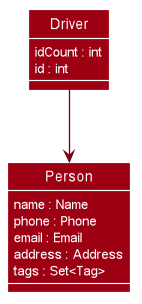
AddDriverCommand requires the following fields: Driver.
The attributes of Driver is as follows:

As seen in the above class diagram, the id field is not required when adding a driver.
The mandatory fields for users are: name, phone, email, address.
A unique id will also be allocated to the Driver for differentiation.
The following sequence diagram shows how the add driver operation works:

Design Considerations
Aspect: Usage of universal Command word
-
Alternative 1 (current choice): Have a individual command word for adding driver. (
addD)-
Pros: Easy to implement and increases clarity for users.
-
Cons: Increases the number of commands.
-
-
Alternative 2: Combine
AddDriverCommandwith otheraddcommands-
Pros: Will use only 1 universal
addcommand for adding any entities. (Task, Customer and Driver) -
Cons: Have to handle different type of parameters and some parameters of commands are overlap which requires more validation.
-
View Driver Window
Implementation
The View Driver Window retrieves the details of a Driver and displays it in a separate window.
It uses the ViewDriverWindowCommand, which extends Command, to return a CommandResult with a boolean value viewDriver as true.
ViewDriverWindowCommandParser is also utilised to parse and validate the user inputs before sending it to ViewDriverWindowCommand to execute.
ViewDriverWindowCommand requires the following fields:`driverId`.
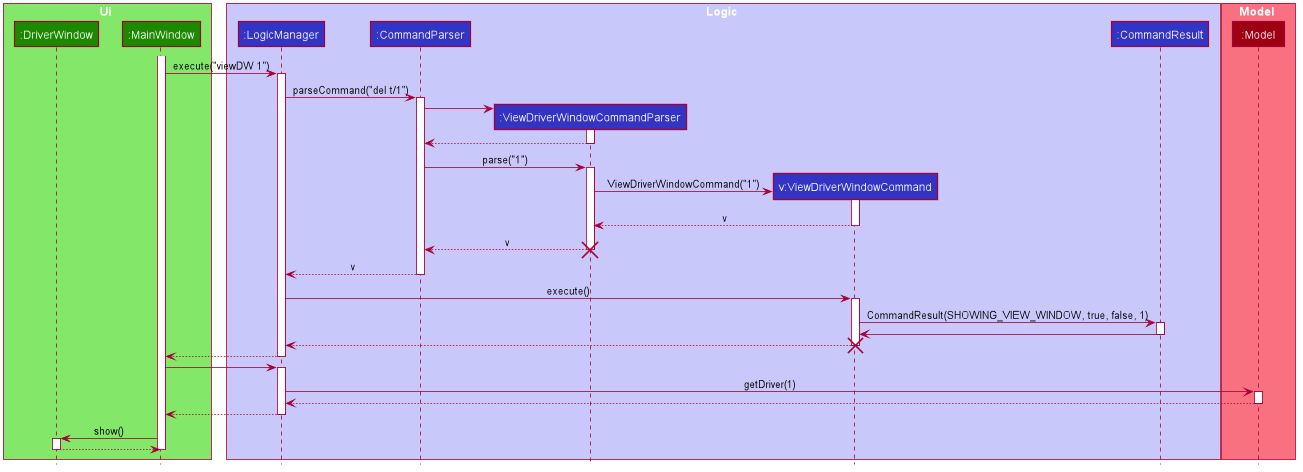
The following sequence diagram shows how the user command viewDW is being executed and handled.

Aspect:
-
Alternative 1 (current choice): Show full details of driver in separate window.
-
Pros: Unnecessary details of driver clutters up the UI. This cleans up the UI allowing the card to only show all essential details.
-
Cons: Harder to implement.
-
-
Alternative 2: Show full details of driver in a single card in main window.
-
Pros: Easier to implement.
-
Cons: Cards becomes too big when schedule information gets too long. Ui looks very cluttered.
-